Pages

Friday, December 3, 2010

Project Yarnway: Final Challenge 2010

Yippee, I've qualified for the final challenge of the "Project Yarnway" on Ravelry!

For this final round the description reads:
...to design and produce a five piece collection. [..] The only stipulation is that the pieces must belong together in some way.
 We even get some extra time to complete this major assignment as it falls right onto the crazy Christmas crafting and holiday time. THANK YOU!

And because of that I will have to come up with something that is quick to make because I have so many other commitments going on right now that I don't even know how to fit everything into a day of 24 hours!

I've finally settled on a theme for my 5-piece collection:
  • I will be exploring the slip stitch technique
For that, I will  
  • design 5 hats/caps each sporting a different application of the slip stitch technique.

As always, I like to learn something new when I knit a project and I have to admit, I have not yet knit many caps because I just look funny and not very photogenic in them. Hence, you won't find many knit caps in my closet. :)

Let's see where this will take me and I cross my fingers that I can complete the 5 caps in time...

Wednesday, October 20, 2010

"Loved" Capelet

I just love the Fall season because that means it's time for color work and cables. Yippee!

When the new Project Yarnway September challenge "Life imitates Art" got posted, I had such a hard time deciding what piece of inspiration to choose... there were so many that I will have ideas and ideas for many years to come! :D
Size modeled: 5-8 (shown on a 6 year old)
I eventually settled on an 8th century B.C. ivory plaque from Mesopotamia and turned it into a heart cable panel for a capelet or poncho. I wanted something different than a vest, sweater or jacket. And this was a capelet proved to turn into a great quick knit.

I added an xo cable design down the sides with two parallel panels for the larger size (child 5-8) and a single panel for the smaller size (child 2-4).


The top heart gets rounded off and the other cables merge smoothly into the 2x2 neck ribbing. Ah, relief the math worked out nicely.


It was a really fast knit (10-12 hrs) with bulky weight yarn and only 46 rounds cable pattern for size 2-4 and 58 rounds for size 5-8. :) Definitely a great candidate for a Xmas or birthday gift...

The fringe band is knit across the narrow side, sewn to the bottom of the capelet and then gets partially unraveled to make the fringe. It's a really neat and efficient way to make a great looking finish.

The pattern has been test knit for both sizes and comes with 6 pages with photos supporting the written instructions. The cable designs are charted.

Hope you'll enjoy it as much as my son loves it!


Happy Knitting!

Pattern Info:   $5.00

Sizes: child 2-4 (5-8)
Finished Measurements: 
Length (neck base to fringe base): 10" + 2-3" fringe (13" + 3-4" fringe)
Neck circumference: 12" (14")
Bottom circumference: 32" (40)"
Yarn:  350 (450) yards / 320 (410) m bulky, chunky, #5, 12-ply yarn
Test knit with: Yarn Bee Melody Bulky Wool Blend, Yarn Bee Icelandic Jewels, Stylecraft Signature Chunky, Naturally Caron Country (double-stranded)
Needles:  US #10 (6 mm) circular needle and dpns; US #8 (5 mm) dpns for neck band and fringe
Gauge:  14 sts x 21 rows = 4" in Stockinette stitch
Skills required: Knitting in the round, reading charts, cables, sewing (fringe band to bottom of capelet)

Friday, September 24, 2010

Knit Simple: Feel-Better Buddies

Yippee! The preview for the Knit Simple Holiday 2010 issue is finally up and my turtle hot water bottle cozie made the cover!

Knit Simple Holiday 2010, photo by Paul Amato
The magazine will hit the newsstands on October 5, 2010.

There are 3 designs (turtle, lady bug, bear) all worked in Lion Brand's Homespun that is machine washable. And from the reaction of my two boys - they should be great gifts for the holiday season.

Turtle, Lady Bug, Bear (photo by Daniela Nii)

This is my first magazine appearance and what an exciting start with a cover and a kit.

I still can't believe it quite yet. Who would have thought such a finale is possible after this design has been reject by other editors a few times (read back story).

I feel very blessed. Thank you, Knit Simple! :)

Sunday, September 12, 2010

3rd Time's the Charm

Just like for writes, knit and crochet designers have to deal with (sometimes lots of) rejections.

IT IS NOT PERSONAL !!!

Even though I am a long-time knitter and crocheter and I get lots of uhs and ohs for my designs from family and friends (advice: take it with a grain of salt), I am a newbie at the publishing side of things. And when some of my first designs got accepted right off the bat, I thought, this is way too cool!

I can tell you, it was quite a shocker when the first rejections started to trickle in, especially for designs I really believed in, took a while to develop and were cute.

For example, one of the rejected designs were my "Bed Buddy" hot water bottle cozies that my two boys were totally crazy about... a sure sign that the design is viable.

Turtle, Lady Bug, and Bear hot water bottle cozies
After a few days of being bummed out, I gathered my wits and tackled the rejection note to see if I could use it to improve on my design:
  • I carefully re-read the rejection wording to get a better understanding for why it might have not worked out
  • Made a short list of possible design improvements
  • Took stock of the yarn color choice for my swatch
  • Switched from a hand-drawn schematic to a computer drawn one
  • Took a critical look at the photo quality
  • Re-evaluated the magazine or website style to ensure (a better) fit for my design idea
  • Decided to spend more time on developing a story to "sell" the design 
  • ... and resubmitted
Just to be rejected again! Dang! And now I've missed the window for the gifting season as lots of magazines work way ahead of the newsstand release date...

So there I watched my boys enjoying their Bed Buddies and being constantly reminded that this design has failed me so far.

Bed Buddy prototype
When the next winter/gifting season rolled around, I took a deep breath and went at it again. And my stubbornness was rewarded: the 3rd time's the charm! :D

And what a hit it was! It not only got accepted by Knit Simple Holiday 2010, but it also made the cover!!! And it was selected for a kit as well!!!

Made the cover of Knit Simple Holiday 2010!
(Knit Simple Holiday 2010, photo by Paul Amato)
That just shows you that if you believe in your design and have gotten some good feedback, don't give up and keep going. It's just a matter of finding the right match...

All the best to your design efforts.

Thursday, September 9, 2010

Interweave Knits: Chincoteague Cardigan

This is my first design published in a major knitting magazine: Interweave Knits Weekend 2010! Yippee!

IW Knits Weekend 2010: Chincoteague Cardigan

It’s a great jacket for your weekend activities knit with Lion Brand's Fisherman's Wool, making it very affordable.

The background sports a “brick” pattern that makes for an entertaining knit and the mosaic technique pattern gives it a more complicated look then it really is.

When you use the mosaic color technique you actually only work with one color per row and slip the other colored stitches. So, no stranding involved at all!

I had to look up the pattern title that was given to my design by the Interweave staff: "Chincoteague". As it turns out the cardigan is named after the wild ponies on Chincoteague Island (Virginia's Eastern Shore). They are all painted in white and brown patterns - just like the design on this cardigan.

Wow, what a great match! And the island looks like a great vacation spot too...

My original design submission was exactly in reverse colors: light background and dark pattern. But I like this final version very much, actually it was hard to let go and send it in... - always a good sign that the project turned out nicely. :)


Tuesday, September 7, 2010

Last Bloom: Flower Headscarf

I thought I would venture into some simple lace knitting and came up with a useful little project: a headscarf.


If you always wanted to try your hand on some lace but didn't want to commit to lace weight yarn, hours of concentrated work and a large scale project, then this might just be what the doctor prescribed: a small, airy headscarf that has only 2 repeating pattern rows and can be finished in a lazy weekend.


You can check out the free pattern ("Last Bloom") over at the great kids pattern website of Petite Purls Fall 2010 issue.


The headscarf is a triangular mesh with short bands to tie it easily.


The flower decorations are simple foundation chain crochet flowers that you sew on to the scarf.
 

To keep the petals from curling up you can either use a few stitches to sew down the petals or apply some fabric stiffener to the flowers before you attach them to the headscarf.

Flower is ready for fabric stiffener. Apply to backside of flower.

I think it's quite a cute way to keep the hair out of the eyes when the winds pick up in the upcoming fall days...So far the headscarf has been a hit with the girls and I am trying to keep up with the requests... :)

Tuesday, August 31, 2010

Id Tags

Just had time for a quick little project to enter in this month’s Project Yarnway August Challenge.


The August challenge descriptions was:

This month had a simple theme: school. I hope you were able to get creative and make something really interesting to show us within this broad theme.

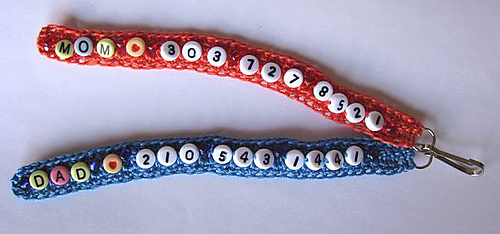
With school start just behind us, I quickly noticed that my young boys have a bit trouble remembering our phone numbers when put on the spot -… which gave me an idea for these ID Tags.

Id Tags
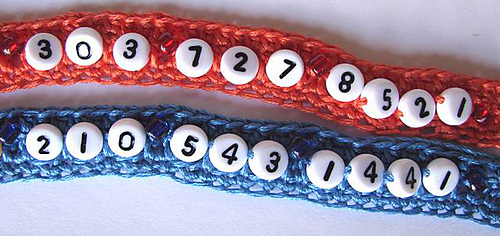
 Made up phone numbers for this sample. Please don't call them.

I used some alphabet and number beads and crochet with the DMC 6 strand embroidery floss a quick and VERY useful Id “Bracelet” that you can attach to your kid’s backpack.

Phone number labels

This way, if they would like to go home with a friend after school, their mom can easily give me a call or in case of an emergency, my kids can read off the phone number without the fear of scrambling them under pressure.

Made up phone numbers

And it’s a neat little thing to dangle off your backpack… :)


Wednesday, July 28, 2010

Cabled Shrug

Ah, a little breather between work, design submissions and proposals. And obviously it has to be filled with some crafting. :)

I've bumped into a yarn sale a bit earlier in the year and picked up a couple of balls of this bright and fresh colored bulky yarn. It's Yarn Bee Melody Bulky Wool Blend (70% wool, 30% acrylic) in "Enchanting" (#120). What a nice yarn to work with! It's soft and glides through my fingers, doesn't split and is machine washable!

I have to admit, I have not yet knit anything in bulky yarn as I am more on the fine yarn, colorwork side of things... but here was a great opportunity to explore the bulky yarns.

After a bit of swatching to get a feel for the yarn and what might look nice with these bright colors, I decided to make the Aran Cabled Shrug by Crystal Yarns (free). This would be a great shrug for the cooler and gray Fall days together with some jeans. I always like to add color to my life. :)

It works up really fast, is a fun easy pattern and I hope to get it done before the next load of work is hitting my desk or needles.

I've made a few minor adjustments so far:

Adjustment 1: Started with CO 7 sts on each side of the cable panel, increased 5 times every 10th row, then increased every 5th row until there were 20 sts on each side of the 36-sts cable pattern.

Adjustment 2: I changed the bobble start to “k1 tfl, k1 tbl, k1 tfl” instead of “k1, yo, k1” to avoid any holes.

My sleeve will be 3.5 diamond patterns long and the back will be 3 patterns across = 10 total patterns.

August 10: Oops, work has caught up with me and my shrug will have to wait for the next break...

Saturday, July 24, 2010

Whale Watching - 12"x12" Afghan Square

Yippee! This square was selected as a finalist!
Will have to wait till Sept. 15 to find out if it was voted as one of the 10 winners…


Entered in the Chain Reaction Afghan Project Contest on www.crochetme.com. You should go over there and check out the other entries…

It is summer time, temperatures are soaring and I am longing for some cooling off. My thoughts wandered off to being on a sail boat, enjoying a nice ocean breeze and watching whales frolicking in the cool waters…

Worked in a soft washable cotton yarn with hook I-9 (5.5 mm). Different stitch patterns have been used to convey the feeling of waves, the sail and sun texture. The background is worked in one piece. The boat and sail are worked onto the background (no sewing). The sun and whale with water spout are crocheted separately and sewn on.

Tuesday, June 22, 2010

Go Fish! - Kids Tank Top

We've been busy bees over at Petite Purls to get the Summer 2010 issue up and running. And what fun patterns there are - AGAIN - and for FREE!

This is the first time I’ve knit something for a boy for summer! Wow, I wonder why I haven’t done that earlier?

This design was definitely inspired by my boys’ love for the aquarium and all the colorful fish. And I love the air-conditioning during a hot summer day. :) So we're all happy campers.


The worsted weight 100% organic cotton yarn was provided by Blue Sky Alpacas, a great sponsor of the Petite Purls webzine. And what a pleasure it was to knit with! You should check it out for your next project - perhaps even a Go Fish tank top?


It's always fascinating to see how the original pattern submission turns into the final piece. For this issue my Go Fish tank top design went through some drastic color changes... my very bright and colorful tank top design for summer that was a lot of fun to knit:

 My 10"x5" submission swatch

But yes, if you don't live in a very sunny spot like Hawaii, California, or Florida this might be too much for you. Haha!

Isn't it amazing how different the two tank tops look even though they are the same design? So make sure to play around with color to find the combination that really works for you.

And if you are a designer, when you submit a design, don't be surprised if you are asked to change colors and/or even the yarn because your design will have to fit into the overall look and feel of a collection or magazine issue.

To read more about this and the other cute patterns, hop on over to Petite Purls or find it on Ravelry.

Monday, May 31, 2010

Double-Knit Headband


The May challenge description was:
This month, you were challenged to learn a new skill - and with that skill, design something that would be a good introduction to the skill for someone else.
As a longtime knitter, crocheter, needlework, lace, beading, etc. multi-crafter it was challenging to find a technique that I haven’t tried yet. Especially because I am always curious about new things. Double-knitting ended up being my technique to learn for this challenge.

I’ve learned quite a bit a long the way (different cast ons, bind offs, design considerations for the mirror image, what design features work and work not so well, etc.) and I am sure to use this technique for the upcoming fall/winter season.

After knitting now 4 headbands, I can nearly knit at regular speed of a typical k1,p1 ribbing (you knit the front side stitches and purl the backside stitches which makes for a k1,p1 knitting experience).

The resulting fabric is so nice thick, warm and squishy that you just love touching it. And the reversible nature of the fabric with its cool color play just tops it off! I love it!

Some notes I took along the way:

I was not quite happy with the cast on/cast off edges. It just didn’t look tidy enough for me, a bit too grungy (could be a look in itself).
 grungy edge

After a bit of experimenting and googling I settled on a 3-stranded long-tail cast-on. You hold your two colors over the index finger and the front color around your thumb.

The trick is to keep the double strand in the same order: red/white, red/white, etc. which will setup your front (red) and back (white) stitches.
3-stranded long-tail cast-on

Then came the cast off. I went with a single strand cast off with k2tog in the front color where I knit the first front colored stitch and from then on k2tog and bind off as usual, k2tog and bind off, etc. This makes for a nice solid front bind off and cute little bumps in the alternate color on the back side. Perfect!
 cleaned up edge

This was a fun challenge and very educational. How about you take the plunge and try a new technique as well?

Wednesday, May 19, 2010

Beadstar Finalist!

I was so excited to find one of my necklace submissions for the Beadstar stringing contest selected as one of the 20 finalists in the "Designs with Heart" section: It's the lucky #13!


"Ribbon Heart" - Designs with Heart

You are invited to vote on the Beadstar site for you favorite design in 9 different categories. So head on over their and check them out. You can vote until June 9.

It was a lot of fun diving into my bead stash and re-discovering all the treasures that have accumulated over time.

Here are my other design submissions:

"Black Butterfly" - Metal category
Various butterfly themed burnished black metal beads and pendant with Olivine fire polished Czech glass beads. 18" long.

"Nearly Jaded" - Stones category
Aventurine carved focal bead and stone chips, interspersed with Cloisonne beads, gold metal discs, and crystals. 20" long.

"Squared Pearls" - Pearl category
Natural Lavender colored freshwater pearls and Hematite beads. 20" length.


"Double Dip" - Plastic category
Various black and white plastic beads with Turquoise flowers. 24" long.


"Candy Coral" - Under $25 category
Real coral beads with Filagree tubes. 16" long.


 I'll list them in my Etsy store over the next few days.

Tuesday, March 30, 2010

Palmy Greeting


Palmy Greeting - 5"x 6.5" card

 The March challenge description was:
Hello Designers, and welcome to the professional runway! This month, your challenge was to create a design using non-conventional materials in an innovative way. Up to 20% of your design could be made from conventional yarns - but I hope you didn’t play it safe.

I’ve enjoyed watching everybody coming up with great ideas, snapping up materials and design ideas that it got harder and harder to come up with something original. :D Nice going!

So, I decided to go with a crochet project for this challenge as March was Crochet Month.

And having been teased with some very warm days just to be followed by a one day snow storm that left behind a foot of snow and lots of sledding opportunities for the kids, my mind was wandering off to warmer playgrounds… The idea for a card design was born with sewing threads as the source material.


I used 3 threads per color to get a 3-ply “yarn” to crochet with. For the palm leaves I decided to go with slip stitches into a chain but with winding the thread first once around a knitting needle to make a loop for a frond.


It was super slippery (used polyester thread, cotton would have been better), splitty, and rather small sized. Yikes! And then I ended up with a pile of curly things - not quite what I had envisioned.
Was this really going to work out?


After patiently untangling, arranging and gluing the mess with a toothpick - it is really coming together! The finish line is in sight!


After a cool tip to use perhaps some buttons for the coconuts and cutting out a sun from some scrap book paper, my little card is finished (5”x 6.5”)!


The card didn't win but I sure enjoyed my little trip to a tropical island and working with not so traditional supplies for crocheting or knitting.

Tuesday, March 16, 2010

Home Run Jersey

Another round of great patterns for the young folks has been released by Petite Purls! So, head on over there and check out the Spring 2010 issue! :)


My "Home Run" jersey design (shown in size 6)
Pattern is written for sizes 2T, 4, 6, 8 and 10

The theme for this issue was "Going Green", meaning the designs should focus on organic, other natural yarns and recycled materials.


I learned a lot on my journey to picking a "green" yarn and you can read all about my yarn choice for this issue's "Home Run Jersey" in the article: Picking a Green Yarn. I've also included links to resources and other interesting tidbits.

Since the yarn I picked was a bit stiffer I decided to go for a top layer garment that could take some abuse from an active boy. The idea for a baseball vest and later a baseball jersey (input from Allegra and Brandy at Petite Purls) was born.

 
Stranded color work was out with this sturdy yarn so that I turned my focus on playing with texture. Perhaps a gansey style pattern would work? After playing around with lots and lots of knit and purl stitch combinations, I settled on a jersey design that sports a Stockinette stitch body and a patterned upper part.

The jersey is knit in the round bottom up until you reach the armhole shaping. Then you work the front and back separately in the flat. Once you close the shoulder seams, you pick up stitches around the armhole and knit the 3/4 sleeve top-down in the round. A single crochet row around the neckline gives it a finished edge and some structure. It's nearly seamless and a really quick knit.


The body bottom starts with a seed stitch band and continues with just straight Stockinette stitch. Then two natural colored garter st lines define the main design panel: Stockinette stitch diamonds on a garter and pearl stitch background. The shoulder and top sleeve sections are worked in a box stitch (2x2 knit/purl stitch combination) and the sleeves end with the same seed stitch band as the body bottom.

Then it came time to pick a number... there are so many great baseball players to choose from! But then, who can beat the legendary baseball player Babe Ruth and his famous #3? Perhaps some of his talent will rub off on my boy too? :)

I picked a natural colored waste yarn (Patons Classic Wool) I had in my stash to duplicate stitch the numbers on the jersey. In baseball, the front number is typically a little bit smaller and offset to the left bottom side where as the number on the back is large and centered.

The jersey was ready for a test run - it passed with flying colors!