Bobble-5
 |
| Slip stitch cables with bobbles in groups of 5 |
My first hat, Flower Fez, used a "Linen Stitch" slip stitch and variegated yarn. This time, I wanted to explore cables with the slip stitch technique.
 |
| Alpaca swatch |
And I had this soft Alpaca yarn that I was dying to use for a project.
Unfortunately, I realized pretty soon into my swatching that although I liked the pattern I was experimenting with, the yarn was not appropriate... sniff... it was swallowing up the slip stitching - or - at least it didn't let the pattern shine as much as I wanted it to. It's not that it was the material, alpaca, but it was more that the twist of the yarn made it busier than it had to be. After a bit more touching and debating, it was time to let go and re-group.
Stepping back and really looking at what I was trying to accomplish, it became clear to me that I needed a yarn with low twist to not interfere with the slip stitch pattern and for this cap, a yarn that was perhaps a bit thicker would be a better choice as well => a roving type yarn!
Hm, why not try to make one of those chunky yarn caps? The slip stitching would keep the fabric from getting too thick in such a small project and I wouldn't have to use a cable needle...
And off I went, digging for the one or two skeins of chunky roving yarn that I knew I had somewhere... after closet diving for a bit, and rediscovering some lost treasures along the way, I emerged with 2 skeins of Patons Classic Wool Roving in "Royal" blue. I was in business.
 The surprising thing was, that I actually didn't spend that much time on figuring out a nice slip stitch cable pattern (I guess my mind had this already worked out during the prep time when I couldn't physically work on it yet), but I knit up so many different kinds of bobbles - Garter st bobbles, St st bobbles, 3-stitch, 5-stitch, 7-stitch bobbles, knit through the back loop to minimize any holes, increases with yo's or knit into the front and back, etc... there are so many possibilities!!!
It was fascinating and side-tracked me a bit but eventually I figured out a combination that I liked for my bobbles and this roving yarn.
Cap
The cap pattern was going to be 5 panels of 2 slip stitch cables each - one with bobbles and one without. The body knit up quickly with this yarn and then came the time for the crown decreases.
Crown
I consider this always as an art in itself - to make the pattern come to a visually appealing end. Sometimes coming up with this kind of crown design can take up more time than the whole rest of the project. I am sure other designers had their share of re-knits to get the crown just right. |
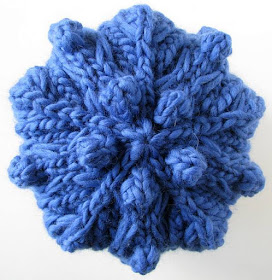
| 5-pointed bobble flower |
I just LOVED how the top turned into this 5-pointed bobble flower... Wow, how cool is that? I have to admit, it turned out nicer than what I was shooting for. I'll take it. :D
Two down, three more to go...!
PS: I'll write up a pattern as soon as I get some time for it.

No comments:
Post a Comment