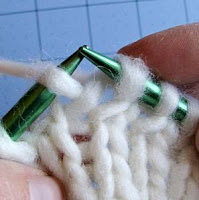
There is a Right Raised Increase (RRI) and a Left Raised Increase (LRI) named for the side the increased stitch will rest on in relation to the root stitch.
The following pictures will show you the two raised increases:
Right Raised Increase (RRI)
Summary: The RRI is worked into the right leg of the stitch in the row below the st on the left needle.
1) Work to the stitch for which the increase will fall to the right side of = root stitch.
1) Work to the stitch for which the increase will fall to the right side of = root stitch.
2) Insert the needle from the front to the back into the right edge of the stitch in the row below.
3) Yarn over needle and pull through - knit the picked-up stitch from the row below.
A right raised increase has been knit.
4) Then knit the next stitch (= root stitch) on the needle.
This is how a Right Raised Increase (RRI) looks like:
You can see that from the root stitch a new stitch is branching off to the right.
Left Raised Increase (LRI)
Summary: The LRI is worked into the left leg of the stitch in the row below a stitch that was just knit (and on the right needle).
1) Work to and including the stitch for which the increase will fall to the left side of = root stitch.
2) Insert the left needle from the front to the back into the left edge of the stitch in the row below.
3) Knit the picked up stitch from the row below.
This is how a Left Raised Increase (LRI) looks like:
You can see that from the root stitch a new stitch is branching off to the left.
I hope this helped. :)


No comments:
Post a Comment