/* Ravelry Shopping Cart */

Tuesday, September 25, 2012

Pattern: Dolman Borealis

Did you notice that the sun is going down earlier and that the temperature drops rather quickly once the sun disappears? The mornings are nippy and even during the day you need something small to cover up a bit?

Photo by: Shane Baskin/Blackbox Studios
My latest pattern "Dolman Borealis" is just in time for those Fall days. The design for this cute little cropped Dolman cardigan takes full advantage of self-striping yarns.

Universal Yarn's Classic Shades yarn with the matching Classic Shade Solids are a perfect example of how self-striping yarns can be shown off, without the sometimes dreaded horizontal lines. By working the cardigan sideways from cuff to cuff, the stripes are turned on their side to create a wonderful array of vertical stripes that reminded me strongly of the Aurora Borealis in the Northern skies. Hence the name for the pattern

Classic Shades has wonderful "painterly" color changes
Classic Shades has really pretty, long and short subtle color changes that made it exciting to watch how the stripes were developing. I've used color #724 "Campfire" for this cardigan but this yarn comes in many, many fascinating color combinations that make the choice quite difficult. :)

And Universal Yarns has now matching Classic Shades Solids to coordinate the ribbing with your self-striping color choice. Pretty cool!

Alright, back to the pattern. The cardigan is worked in one piece from cuff to cuff which makes it a quick knit. The neckband and buttonbands are worked from the center back neck downwards and then joined with picked up stitches for the bottom ribbing. This further supports the fresh and slimming vertical lines with vertical ribbing down the front and around your waist.

The pattern is sized for 6 (!) sizes and comes with detailed schematics and an Appendix for special techniques used in this pattern. They are: a One-Row Buttonhole, the Knitted Cast-On (for "growing your sleeve to the full body length), the Cable Cast-on (for the button hole) and the Provisional Crochet Cast-On (for the neckband). You are always welcome to replace them with your own favorite technique.

If you are interested in this pattern, you can purchase it for $4.50 through Ravelry (you don't need to be a member) by clicking on .

Happy Knitting and have a wonderful Fall season!

Sunday, September 23, 2012

Visited Wonderful Colorado Springs Knitting Group

After cheering on my younger son in an exciting morning soccer game in Longmont, it was time to zoom down to Colorado Springs to meet up with a knitting group I was invited to by Yvonne.

I've met Yvonne earlier this year at the Estes Park Wool Market where she was a student in both of my workshops: "Knitting with Beads" and "Discovering the Intrasia Color Change as a Design Element". We had a great time and soon discovered that we could chitchat in German as well (I grew up outside of Zurich,Switzerland, where you speak German). By the end of the workshops she threw out the idea of me coming to visit her knitting group, luring me with visions of lots of good food, lively conversations and of course, lots of knitting. And it seems to have worked, haha!

So there I was, being dropped off by my family at our hostess' house with three bags of stuff to work on and to show. You might wonder why so much? Well, I was between projects with lots of swatching going on so that I couldn't make up my mind about what I should be working on next. Ah, those decisions! There are the things you should be working on, the ones you want to be working on and the ones you are actually working on...

It was funny to hear when one of the ladies said: "Ah, now I don't feel so bad anymore about having all these (plastic) bags with projects lying around!" because that's what spilled out of my bags: lots of large zip lock bags (one per project), grocery plastic bags for larger projects and even some loose balls of yarn.

That started an interesting discussion about how everybody stores their yarn stash. There is the issue of storage itself and then also of how to group yarns for you to find easily.

We found out that most of us store our yarns in lidded plastic tubs but also in bags, baskets, shelves, and hanging shoe towers for portability (loved that idea). But one lady had the setup I think most of us are just dreaming of: a whole room dedicated to knitting/crafting and a wall full of yarn. Heaven! And the kicker is that if you ask if she would sell some of the yarn you see there on display, she does (if it's not slated for one of her own projects)! It's a personal yarn store! LOVE IT!

I am curious, how do you store your yarn? Perhaps you have a solution for our ever-growing stash that we didn't think of yet...oh, and if you are in need of some storage ideas, check out this Pintrest board for inspiration: http://pinterest.com/lionbrandyarn/craft-spaces-storage/

And then I think I surprised people when I told them that I group my yarns not by color as you are so used to seeing in yarn stores, or fiber (e.g. wool, alpaca, cotton, etc.) but by yarn weight. That is, I group my yarns by how thick or thin a yarn is, grouping them into lace, fingering, sport, dk, worsted, aran, bulky, super bulky, and fashion yarns.

Because let's think about it for a moment: When I want to start a project or come up with a new design, I usually know if it is going to be a sock, a lace shawl, a sweater or a cap. So then, doesn't that dictate what weight of yarn you want to start with?

I've had it happen to me too many times that I held a gorgeous skein of yarn in my hand just to wish I would have it in a different weight for my project... VERY frustrating!

But only through taking designing more seriously, I've finally realized how I work and approach things. By grouping my yarns by yarn weight first, I am now able to peacefully choose from only the available colors in that class. No more moaning or wishing for something I don't have and in the worst case, keeping me from getting started.

So, how do you group your yarns? Does it work for you?

I hope you were able to gleam some interesting information from this post, and yes, ladies, I will be happy to come back for another visit to Colorado Springs where the Aspen leaves have already turned yellow. See you all soon!

Monday, September 3, 2012

Beaded Peacock Socks in Sock-A-Licious (by Kollage Yarns)

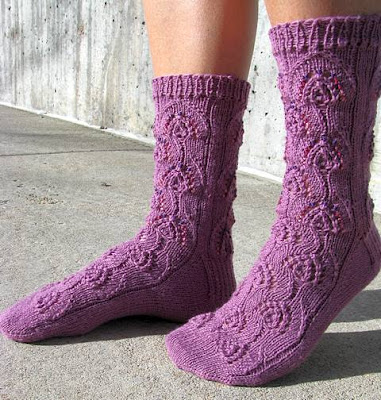
After a super busy summer of designing, knitting, pattern writing, tech editing and spending time with my boys over summer break, I am finally able to cast on for my 2nd version of my upcoming "Beaded Peacock Socks" pattern. :)

The first version, sported a solid colored yarn (5th Avenue Toe-rriffic Sock Solids, color #0503 Violet)  with multicolored beads...

Version 1: Solid colored yarn with multicolored beads

...and this 2nd version, will be in a multicolored yarn with solid colored beads...

For the multicolored yarn, I've picked this really wonderful yarn called Sock-A-Licious by Kollage Yarns in the colorway Purple Heart (#7814). It's a 70% fine superwash merino, 10% silk, and 20% nylon mix that really lives up to it's name of Sock-A-Licious and with ample yardage too (354 yd/325m per 3.5 oz/100g).

Colorway: Purple Heart (#7814)

It has a wonderful hand, is deliciously soft (no problem for next to skin) but tightly spun to show off cables and other textures well and it comes in many vibrant, deep colors. It's a joy to knit with. :)

Since the original socks have been completed, I've run across a new nifty cast-on, especially well suited for toe-up socks. It's a brain child of Judy Becker (as in Judy's Magic Cast-on), as well as Queen Kahuna.


Here is a YouTube link to a video by Cat Bordhi of how to do this Stockinette center, toe-up cast-on. LOVE it! This is going to be my new favorite toe-up sock cast-on. :)

Happy Knitting!