/* Ravelry Shopping Cart */
Showing posts with label Slip Stitch. Show all posts

Wednesday, October 24, 2012

Pattern: Semblance Cap

This pattern is the result of me trying to come up with a multi-color design that can easily be personalized for a quick knit gift. :)

Cap knit once in school colors and once in favorite sports team colors
It uses 3 colors and a simple slip stitch pattern so that you actually work in only one color per round at any given time. :)

The cap is worked in the round from the bottom up and fits children (8+) to adults with a head circumference of 20-23" (~51-58 cm). The instructions are written out or you can work off a chart. You can find more pattern details by following this link to the Ravelry pattern page.

My oldest son chose his school colors for his cap and my youngest son picked his favorite sports team's colors (the Rockies, our local professional baseball team).

The caps were definitely a success as I now have a request from the boys for matching mittens and a cowl... but then feel free to use more girly colors for a quick gift for the women in your life...

Tuesday, September 6, 2011

Creative Knitting: White Mountain Kimono Coat

My super warm Rowan Cocoon coat design is out in the Creative Knitting Magazine September 2011 issue! Yippee!

Ooh, if you have not yet touched the Rowan Cocoon yarn, you are missing out on a treat. It is such an buttery soft yarn that you just wish your project would never end...well, you do want to finish but at the same time you don't want to let go of this yarn...

Photo by DRG

You might remember that I was playing around with all different kinds of slip stitch patterns for my final 5 piece collection (hats) for the finale of the Yarnway Project. That was actually a result from exploring pattern options for super bulky and bulky yarns. I really like cables but didn't want the bulkiness it would create with these specialty yarns. Slip stitch cables, or I like to call them "mock cables", are a great way to give the impression of cables but without the thickness and awkward cabling of super bulky stitches.

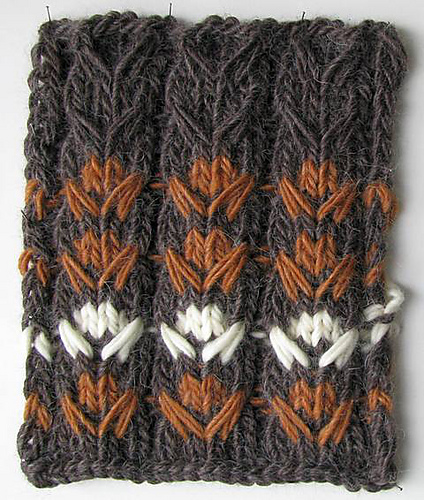
The mock cable for this coat came about through a happy accident - when I was experimenting with different slip stitch patterns my swatch escaped and fell to the floor. As it turns out, it had rotated so that when I was looking down to pick it up it was upside down and my imagination saw flower heads with leaves staring back at me...

I quickly grabbed another color to try out my "vision" and was happy to find that the pattern lent itself well for a two color variation that really turned the original slip stitch pattern into something new...


Left: Swatch is knit from the bottom up

Right: Swatch turned upside down

Doesn't that look like flowers? :)

This happy accident was quite an eye-opener for me and I now routinely turn my swatches every which way to look at it from different directions. I even look at the wrong side of a swatch because you never now what you will find there... and another thing happened: this small act of looking at a swatch from a different direction than the "traditional" way somehow freed me from my own rules (I didn't realize I had them until then) and allows me now to "think out of the box" more often. So, turn you work around and see what you might discover. You will be surprised. :)

Well, that was all fine but it also meant that I needed to knit this coat upside down or top down. I've never done that before! This was going to be a learning experience and all under a submission deadline...

Photo by DR
It definitely forced me to think the whole design through before casting on my first stitch. I couldn't just begin at the bottom and as I was working my way up I would figure out what to do for the sleeves, neckline, etc.

It was a bit unnerving because I felt the time ticking away and I still didn't have any stitches on my needles... but in hind sight, it did teach me another valuable lesson: you should always think your design all the way through before casting on because then you will become aware of iffy design decisions or problem areas, especially if you to size the pattern for multiple sizes...

Okay, more seasoned designers will most likely know this already but for me, this was a major insight. I guess, it's one of those things you learn when you move from a single-size-family-and-friend-knitter to a designer-who-publishes-patterns-in-multiple-sizes... ;)

The coat knit up very quickly thanks to the thick yarn (Rowan Cocoon held double throughout) and the very easy and addictive slip stitch pattern (just one more flower row, and one more...). I was making good time... and then came the finishing.

Photo by DRG
I should know by now that the finishing just takes time if you want to do it right. And considering that the magazine might want to show close-ups of some detail, there were no short-cuts allowed.

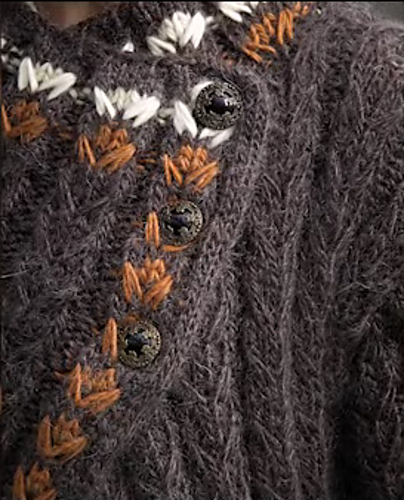
It was important to get the knitted on I-cord right and then the hunt for buttons is on. I don't know about you, but I seem to spend a lot of time looking for the "right" button. I still have to come up with some good sources for buttons. You know, buttons that are somewhat special but won't break your bank?

I've been pretty lucky so far with finding some at the local sewing stores and I do have a card of a button lady I met at a crafts fair. Finding the right closure is such a crucial step. You don't want a button to distract from you design, unless it is the focal point, but at the same time you don't want to use cheap looking ones either as it will devalue your lovingly, hand knitted garment. So, make sure to take your time to find the right fit but don't let it keep you from wearing it either. Use a decent button as a placeholder and change it out as soon as you score "the one." :)


Monday, February 28, 2011

Project Yarnway: Finale 2010

Alrighty, the inaugural year of Project Yarnway over on Ravelry.com has come to an end with the official deadline to post your 5-piece collection by today, Februrary 28, 2011.

Voting will start on March 1st and will last for 2 weeks.

I broke the ice and went first on the Professional Runway with the following post:

Slip Stitch Explorations

For this final challenge, I decided to explore the slip stitch technique in more detail with a collection of 5 caps/hats - each worked in a different slip stitch technique.

For each cap, I tried to match a slip stitch technique with an appropriate yarn and styling. I had my share of trials and errors (see earlier blog entries for more details) and with mounting time pressure (only had some time during the last 2 weeks, eeks!) it was getting awfully tight.

But when I was done last night, I was blown away and very surprised to see how versatile the slip stitch technique can be. Just look at how different every cap/hat's style is!

Let me introduce you to my 5-piece collection:

Vertical Mosaic - panel

Cap #1 (Vertical Mosaic): With this cap, I explored the traditional use of slip stitches for color work, called "Mosaic". I soon realized that it is a neat technique for making vertical lines without resorting to stranded, intarsia or side-to-side knitting.

Doesn’t this cap look quite intricate? But with slip stitches you work with only one color per round at any one time!

This is a great technique for some bold statements zipping down the ski trails...

Flower Fez - panel

Cap #2 (Flower Fez): This cap was quite the journey for me: I've learned the braided trim cast-on for this project, re-knit sections of this cap a couple of times, and made my first ever flat top. And it was still not quite right until I added a crochet trim at the top edge and the 3 dangling flower "tassels".

The Linen Stitch makes for a pretty dense fabric, perfect for this pillbox shaped cap. And again, every round has been worked in one color only. Fascinating...

Mesh Beret - panel

Cap #3 (Mesh Beret) called for something more unusual. I was wondering if there was anything out there for a more Spring/Summer type cap. And indeed: you can use slipped stitches to create elongated "posts" for a mesh fabric that reminded me very strongly of double crochet stitches in Filet crochet.

I intentionally chose a very drapey yarn and combined with the airy mesh slip stitch pattern, I ended up with a slouchy beret. Two long crochet chains in complementing colors woven through a mesh row not only rounded out the picture but also double as ties to keep the beret in place. :)

City Slicker - panel

Cap #4 (City Slicker): The next slip stitch to play around with on my list was the Brioche stitch (in the US perhaps better known as Fisherman's Rib or Shaker Rib or one of the many other variations of this popular stitch).

I was curious to see if I could work this stitch on the bias to create diagonal lines. I picked the Stockinette Brioche stitch and worked a double increase at one edge, paired with a double decrease at the other edge. But instead of working the incs and decs every 2 rows, I worked them every 4 rows because they were doubles and not singles.

This cap is worked flat, one color per row only (!), sewn up on the side and then the stitches for the top are picked up to finish off the crown. The cap is worked extra tall so that the rim can be rolled up for a snazzy "melon hat" look.

Bobble-5 - panel

Cap #5 (Bobble-5): As it turns out, slipped stitches are a great alternative for the chunkier, thick yarns because they don't add as much bulk to the fabric as a full cable cross-over does. You can create some pretty neat cable imitations with slipped stitches.

While working on the design for this cap, I got a bit sidetracked by exploring bobble making. You won't believe how many different ways one can make bobbles! 3-, 5-, 7-st bobbles, Stockinette and Garter st bobbles, increase by kfb, yo's, etc.

Well, and there you have it - 5 caps all worked with a slip stitch technique. :)

I have gained a wealth of new knowledge with this final challenge, not only about slipped stitches, but also about yarn selection, stitch pattern influences on fabric properties, cap construction, bobbles, and I've learned the braided trim cast-on.

I'm even wearing a cap now (the City Slicker and Flower Fez are my favorites) without feeling like an egg head. Haha!

Thank you all for organizing, managing, participating and voting for the great Project Yarnway challenges throughout the year.

Check out all the other entries as well - and vote!

Cheers, Daniela

Monday, February 21, 2011

Project Yarnway: Vertical Mosaic (Hat 3)

The slip stitch technique is most likely best know for its ability to allow a knitter to design some fancy color work that requires the knitter to work with only one color per row/round at a time - no stranded knitting required!

I've already used this technique for my Chincoteague Cardigan (Interweave Knits Weekend 2010) and was looking forward to further explore its possibilities.

One thing I've noticed is that it is a really neat way to make vertical stripes without stranding or intarsia or working side-to-side. So, with this cap, I've combined some mosaic design with vertical stripes and called the cap "Vertical Mosaic":

 The back side does look like stranded knitting but I can assure you every round was worked in only one color and all the "other" colored stitches were slipped.


It knit up really fast and my kids already want their own caps in their school colors. Haha!

This cap was knit with Patons Classic Wool in "Royal Purple" and "Winter White" (a worsted weight 100% wool yarn) on US #7 (4.5 mm) needles.

Friday, February 18, 2011

Project Yarnway: Bobble-5 (Hat 2)

Zooming right along with my second piece for my 5-piece collection for the final challenge of Project Yarnway over on Ravelry:

Bobble-5
Slip stitch cables with bobbles in groups of 5
As you recall, I chose to investigate the slip stitch technique for a 5-piece hat/cap collection.

My first hat, Flower Fez, used a "Linen Stitch" slip stitch and variegated yarn. This time, I wanted to explore cables with the slip stitch technique.
Alpaca swatch

And I had this soft Alpaca yarn that I was dying to use for a project.

Unfortunately, I realized pretty soon into my swatching that although I liked the pattern I was experimenting with, the yarn was not appropriate... sniff... it was swallowing up the slip stitching - or - at least it didn't let the pattern shine as much as I wanted it to. It's not that it was the material, alpaca, but it was more that the twist of the yarn made it busier than it had to be. After a bit more touching and debating, it was time to let go and re-group.


Stepping back and really looking at what I was trying to accomplish, it became clear to me that I needed a yarn with low twist to not interfere with the slip stitch pattern and for this cap, a yarn that was perhaps a bit thicker would be a better choice as well => a roving type yarn!

Hm, why not try to make one of those chunky yarn caps? The slip stitching would keep the fabric from getting too thick in such a small project and I wouldn't have to use a cable needle...

And off I went, digging for the one or two skeins of chunky roving yarn that I knew I had somewhere... after closet diving for a bit, and rediscovering some lost treasures along the way, I emerged with 2 skeins of Patons Classic Wool Roving in "Royal" blue. I was in business.

After another round of swatching, I settled on larger needles than recommended on the band for a softer, fluffier hand.

The surprising thing was, that I actually didn't spend that much time on figuring out a nice slip stitch cable pattern (I guess my mind had this already worked out during the prep time when I couldn't physically work on it yet), but I knit up so many different kinds of bobbles - Garter st bobbles, St st bobbles, 3-stitch, 5-stitch, 7-stitch bobbles, knit through the back loop to minimize any holes, increases with yo's or knit into the front and back, etc... there are so many possibilities!!!

It was fascinating and side-tracked me a bit but eventually I figured out a combination that I liked for my bobbles and this roving yarn.

Cap
The cap pattern was going to be 5 panels of 2 slip stitch cables each - one with bobbles and one without. The body knit up quickly with this yarn and then came the time for the crown decreases.


Crown
I consider this always as an art in itself - to make the pattern come to a visually appealing end. Sometimes coming up with this kind of crown design can take up more time than the whole rest of the project. I am sure other designers had their share of re-knits to get the crown just right.

5-pointed bobble flower
In this case, I knew, I wanted one more set of bobbles and integrate the decreases in such a way that they are part of the pattern. After studying the different lines that I could go with for a little while and considering different options, I forged ahead and actually got it "right" on the first try! Now that is a boost and makes up for some time lost during my bobble explorations.

I just LOVED how the top turned into this 5-pointed bobble flower... Wow, how cool is that? I have to admit, it turned out nicer than what I was shooting for. I'll take it. :D

Two down, three more to go...!

 PS: I'll write up a pattern as soon as I get some time for it.

Monday, February 14, 2011

Project Yarnway: Flower Fez (Hat 1)

As usual, it is high time for me to get started on my entries for the final challenge of Project Yarnway. Even though I didn't physically knit anything yet, my mind and pencil have been busy with coming up with design ideas for the 5-piece challenge.

It has been very educational to research slip stitch techniques and patterns (see previous post about my theme) and I found out, that I actually know the author of the book: "Slip-Stitch Knitting - Color Patterns the Easy Way"! I am in her charity knitting group that meets once a month! Who would have thunked that?

So, here is my first, not quite yet complete, project: a Fez or pillbox hat worked in a slip stitch pattern called "Linen Stitch":

Flower Fez: Linen Stitch Pillbox Hat

Lots of different things had to be considered here:
  1. What yarn did I have in my stash because I didn't want to buy more yarn? How long should the color sections of the variegated yarn be?
    => I chose a solid colored (Lion Brand Alpine Wool) and a variegated yarn (Patons SWS (Soy Wool Stripes)) with long color sections (~10 yards per color) to put the claim that slip stitch patterns are a great choice for variegated yarns to the test.
  2. The linen stitch pattern will be pretty solid so that I most likely will have to go up in needle size.
  3. The stiffness of the fabric could be used to its advantage by turning it into a design that benefits from its "standing" qualities
    => that led to my selection of a pillbox design.
  4. Some additional design element had to be added to break up/support the small linen stitch pattern and to add some visual interest
    => I chose a braided cast on (never done that before)
 So last Friday, at my KnitWits' monthly knitting group, I started with my swatching and quickly noticed the dramatic gauge difference when I switched from Stockinette st to linen stitch! Wow! I tried to change the needle size which made for a softer fabric but still couldn't make up for all the difference. At least it gave me a good idea of the ratio that I needed to increase when I was switching from the ribbing to the main body of the hat.

The night before, I had been studying a braided trim cast-on on YouTube that I really liked and wanted to use for my pillbox hat. And as usual when you go surfing the web, there are always many more things you come across that are interesting -- and suddenly a lot of time has disappeared... ! :)

The swatch also gave me a good idea of how the variegated yarn would look and a mistake I made while I was chit-chatting too much with my fellow knitters (I lost track of my round repeats), turned out to be a pattern that I preferred to the one I set out with! Ha, neat. :)

That evening, I just had to start with the hat.

Cast-On
Braided trim cast-on
I patiently worked my way through the braided trim cast-on and continued with the ribbing. But something just wasn't quite right.

First of all, my gauge was off, and I needed to do my cast-on over with a smaller number of stitches.

That just shows you that being off by 1/2 or 1/4 stitch in your gauge measurement can really multiply into a large error for a hat.

Alright, 2nd attempt: circumference was correct now but I didn't like the color combination for the braid - it was too little contrast for my taste. Why do all the work of a braided trim if you don't get the bang for the buck?

3rd attempt: So I unraveled it again, pulled out the variegated yarn until a darker color showed up and went at it again. Aha! That was worth it.

Body
Knitting the hat body was straight forward although I had to consider what to do at the row transition because every other row I would end up with 2 slipped sts in a row instead of just the one. A k1 "seam" st would make for a nice solution to that problem. And around and around I went.

Crown
Then came the time for the crown, well a flat top. I have never knit a flat top before...! But it should follow the same principal of a doily, right? I've knit and crochet doilies before... for my 1st attempt, I worked the flat top in the variegated yarn, thinking that it would add some interesting concentric circles to the top. But the color sections were too long to really shine and it was actually distracting from the classic look of the pillbox body.
So for my 2nd attempt, I went with the solid color and decided to try a spiral pattern to add some interest that way. Well, 8 spirals was too many and my bulky yarn didn't behave with the classic decrease every 2nd row - it formed a little dome (which could be a design feature, but not for this hat).
So finally on my 3rd attempt, I got the decreases down and my flat top was finished. Yeah!

Finishing
Hm, nice hat but it's missing some character.

First, I added a braided tassel - nah, too small. Then I added a bunch of them - nah, looked like a bird's nest. Then I thought of crocheting some simple flowers each in a different color of the variegated yarn - yes, that will work!
 Crochet flower "tassels"

Hm, this hat is still missing some shape. It just doesn't look like a pillbox to me. After some mulling over and trying out some ideas, I finally settled on a simple top edging my crocheting one round of chain sts right along the color change where the body meet the flat top. Ahhh, that was the missing piece to make this design complete. :D


Boy, after 3 days of trial and error I finally got a design that I liked. Now that was a learning experience and a journey for a single hat! I hope my other 4 hats will be a bit faster or I will run out of time...

Off to write up the pattern and take some modeled pictures... gotta find a willing victim!

Thursday, February 10, 2011

Charity: Polka Dot Caps

What a cute pair of caps!


It's a slip stitch pattern, knit with the same two colors but in reverse order. And look how different they are! It shows that it pays to play with your color combinations...

Found somehow the time to complete two caps for my Community Knitting group besides all the other knitting and work projects crowding my time right now. :)

Gotta fill in some blanks from the last couple of months. A Thanksgiving trip to Europe, a Christmas crafts fair and Christmas gift knitting and some magazine submissions kept me on my toes and I am just now coming up for some air. Wow, that was crazy!

But I am loving every minute of it! :D