/* Ravelry Shopping Cart */
Showing posts with label Knit. Show all posts

Sunday, December 30, 2012

Pattern: Snowflake Hot Water Bottle Cozy

Who would have thought that I would use my just recently released Snowflake Hot Water Bottle Cozy myself in such a short time?!


But with single digit and teen temperatures over night and with my hubby out of town, I have nowhere to warm my icicle feet! And cold feet sure keep the sleep from coming and that is not a good thing if you have your mind going at a hundred miles an hour anyway...

I've found that a cup of hot chamomile tea with a teaspoon of raw, unfiltered honey nicely warms up my body from the inside, the chamomile aroma calms down my soul and the warm snowflake clad bottle by the feet chases away my cold feet... ah, bliss and I am off dreaming...

What are you doing to fall asleep when your mind is still busy?


BTW, the snowflake cozy fits a standard 8" x 10" hot water bottle and sports the snowflake on both sides. It has a cute picot bind-off and you can either use a 20" long ribbon or crochet a foundation chain for the tie.

I've used Lion Brand's Cotton Ease #113 Cherry for this cozy and it is really soft against your skin. I was pleasantly surprised and you can machine wash it too.

The pattern has written out instructions to knit it flat or in the round as well as instructions to work it off a chart flat or in the round. It knits up really quickly and uses less than one skein of yarn! Love it. :)

Well, it is getting late and my cup of chamomile tea is calling my name. Have a wonderful night of sleep with nice warm feet.


Friday, December 14, 2012

Miracle Frost Flower Wrap

I've just completed a wonderful Frost Flower Wrap as a Christmas gift for my mom!

Frost Flower Wrap: 24" x 66", blocked, in timiQuipa 100% baby alpaca, color: rust
I am so excited about it not only because it turned out beautifully but also that I found the time to do some "leisure" knitting. Big pat on my shoulder! :)

For the last couple of weeks I have been so busy with my job, kids, attending middle school open houses with my oldest son, lots of knitting submission deadlines, tech editing, swatching, pattern & article writing plus all the holiday busyness that this shawl truly represents a little miracle.

I must have more than 24 hours in my day looking at that long list, haha! Seriously, there was no way I should have had the time to knit this generously sized, 24" x 66", warp. But here it is...

 
I hit on a little secret for this success and it is actually pretty simple:
Knit every day a little bit and you will be surprised by how much can be accomplished - and how quickly too!
That's exactly how this warp came to be. I made a point of knitting a couple of rows or more every day. Which also meant that this project traveled with me to wherever I went because you never know when an opportunity for a couple of minutes of knitting will present itself. You will be surprised by how much time we spend waiting for something every day. And now I filled it with some enjoyable knitting! :)


I knit during my kids' soccer practices, while waiting in the car for them to get out of school, during car trips for running errands where I was the passenger, during visits with friends, during an oil change, during short work breaks and before going to bed instead of reading a book. The minutes and rows will add up quickly, I am telling you.

I did make one time concession though: It's not my own pattern but one that I happened to have bumped into a while back on Ravelry when I was doing some research for some other design ideas.

I did make it a bit wider than the original pattern called for and adjusted the length of the Frost Flower lace edging accordingly so that the proportions looked right. For a few more details visit my Ravelry project page.

The yarn I chose for this project was purchased online at DBNY (Discontinued Brand Name Yarns). It is a super soft, 100% baby alpaca, sport weight yarn by timiQuipa. And the color "Rust" is so deep and rich - perfect for the grayer time of the year.

Purchased online at DBNY

Big "Thank You" to the folks at DBNY to take the extra time and effort to match dye lots when I decided to make a wrap instead of a scarf and ordered more of this yarn a couple of weeks after my initial first order. And I have still 2 skeins left over for perhaps some fingerless mittens?

Post office, here I come! Ready to stand in line... now, where is that other knitting project I still need to finish...?

Saturday, December 1, 2012

Beartooth Wrap Finally Out!

Whoo-hoo, the Beartooth Wrap pattern is finally out and available for purchase!

The wrap was inspired by the rows and rows of mountain ranges forming the Rocky Mountains
It seems like I nearly got lost on the many switchbacks of the ~68 mile (~110 km) long Beartooth Highway (U.S. 212), a National Scenic Byway and All-American Road, that traverses the Beartooth Mountain range along the Montana and Wyoming state border to meet up with the Chief Joseph Scenic Byway, which forms the northeast gateway to the Yellowstone National Park... or perhaps the thinner air atop the Beartooth Pass (10,947 ft/3'337 m) slowed me down... :)

Approaching Beartooth Pass (photo: Phil Armitage)
But, finally the wrap has been finished, the pattern written, photos shot and all has been put together as a pattern.

It's not like I've forgotten this wrap. I've actually been enjoying its warmth during our wonderful Fall weather here in Colorado that consists of nearly constant sunny weather, blue skies and an occasional surprise winter weather with short-lived snow in the foothills. It has been unseasonably warm so far (lots of warm Chinook winds blowing) and we are enjoying day temperatures that allow you to go outside in jeans and a light sweater (~60F/16C) at the end of November! I wonder if we will have white Christmas this year...?

Since I've been using my own wrap (I like designing things that I like to wear or be seen in), I can say that it has just the right warmth and feels nice an light. With mohair you always have to be careful because it can be very warm. So I came up with a fun zigzag design that not only uses a smart distribution of "mohair warmth" but it also allows the mohair to become the focal point by highlighting its contrasting airy texture to the surrounding solid wool stripes.

I also love the tactile nature of this wrap catching myself "petting" the mohair repeatedly... :)


The funny thing is that the two yarns I've used for this wrap have been lingering in my stash for a couple of years and have been purchased independently from each other! And I only made the connection after re-organizing my stash a bit and them accidentally ending up close to each other. That's when it hit me that they were a great color match. Yes, I was able to actually use yarn from my stash!

But as so often with mohair, the wonderful brushed mohair by Plymouth Yarn called Outback Mohair has been discontinued since I bought it so that I went on a little substitute yarn hunt. I was looking for a brushed mohair and not the lacy type.

The brushed mohair on the right is what you want, NOT the lace type on the left.
As my first stop, I visited my own website, LocalFibers.com, to see if I could find some US mohair that could fit the bill. And yes, indeed, there is a company called Mountain Colors Yarns that produces a brushed mohair called "Mohair"available in just gorgeous colors. You can choose from hand-painted colorways and solitary colors so that you should have no problems matching it up with your wool yarn for this wrap.

After a quick email exchange with Mountain Colors I received a small Mohair yarn sample in the mail to double check if it would work as a substitute  - and it's a perfect replacement for the Outback Mohair by Plymouth Yarn. Yippee!

BTW, their other yarns are a real find too and the colors are just amazing...

And on top of this great yarn find, it turns out that the Mountain Colors company is located in the state of Montana which happens to be the home of the Beartooth Mountain range that I chose to name my wrap for! Can it get any better? This really came together so smoothly that you know it just had to be this way, right?

The other neat thing about this pattern is that it is a quick and easy introductory project to the Intarsia color knitting technique. Actually, I think you will be more occupied staying on top of your seed stitch border pattern than worrying about managing your few balls of yarn. And since they are generous sweeping color sections, you will have a minimal number of yarn tails to weave in at the end. Love it! :)

To make the pattern more knitter friendly, the pattern instructions come in written out format as well as a charted design. Pick the method that works for you best and let me see your great mohair/wool wraps.

I will head out now and enjoy the mild late Fall days with my wrap as a companion and dream up some more nature inspired designs...


Happy Knitting, Daniela

Sunday, November 25, 2012

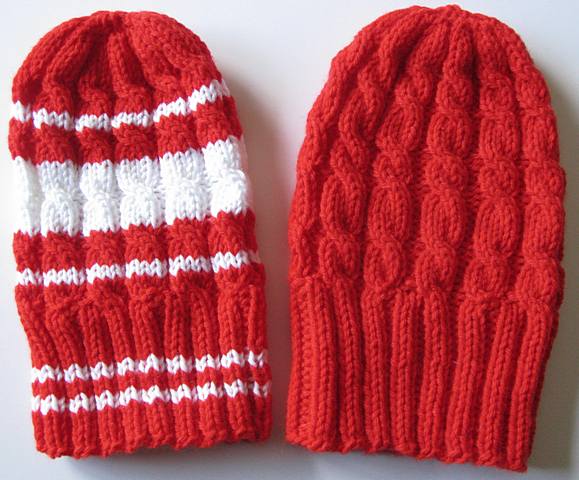
Charity: Cabled Kid Caps

Oh, boy, how did I enjoy to finally being able to join the monthly Community Knitting group organized by Roxanna at Shuttles, Spindles and Skeins in Boulder, CO. Fall soccer was DONE! No more interference with my social knitting events. :D


It always feels so good to do some charity knitting and chit-chatting with like-minded fellow knitters. And since it had been quite a few months since my last visit, I had a lot of catching up to do.

This month's cap project was going to be part of Xmas bundles (cap, cowl, mittens, vest) that were handed out by a local family homeless shelter for Christmas.

The original pattern by Roxanna had short, same-sized cables for the whole cape length but I changed it to alternating between shorter and longer cables. I was not quite in the mood for that many cable crossings. :)


And since I still had quite a bit of red yarn left over, I dug in my stash a bit and found a white mystery yarn to complement the red yarn and knit a second cap.

This was my first time to knit with Patons Canadiana Solids and I was pleasantly surprised by the soft hand this 100% acrylic yarn had. This was not only nice to knit with but also soft against the skin. Wow!

But I would say that this is a thick worsted, nearly aran weight yarn. I'll have to remember this yarn for projects that need non-wool, machine-washable yarn...

Wednesday, October 24, 2012

Pattern: Semblance Cap

This pattern is the result of me trying to come up with a multi-color design that can easily be personalized for a quick knit gift. :)

Cap knit once in school colors and once in favorite sports team colors
It uses 3 colors and a simple slip stitch pattern so that you actually work in only one color per round at any given time. :)

The cap is worked in the round from the bottom up and fits children (8+) to adults with a head circumference of 20-23" (~51-58 cm). The instructions are written out or you can work off a chart. You can find more pattern details by following this link to the Ravelry pattern page.

My oldest son chose his school colors for his cap and my youngest son picked his favorite sports team's colors (the Rockies, our local professional baseball team).

The caps were definitely a success as I now have a request from the boys for matching mittens and a cowl... but then feel free to use more girly colors for a quick gift for the women in your life...

Tuesday, September 25, 2012

Pattern: Dolman Borealis

Did you notice that the sun is going down earlier and that the temperature drops rather quickly once the sun disappears? The mornings are nippy and even during the day you need something small to cover up a bit?

Photo by: Shane Baskin/Blackbox Studios
My latest pattern "Dolman Borealis" is just in time for those Fall days. The design for this cute little cropped Dolman cardigan takes full advantage of self-striping yarns.

Universal Yarn's Classic Shades yarn with the matching Classic Shade Solids are a perfect example of how self-striping yarns can be shown off, without the sometimes dreaded horizontal lines. By working the cardigan sideways from cuff to cuff, the stripes are turned on their side to create a wonderful array of vertical stripes that reminded me strongly of the Aurora Borealis in the Northern skies. Hence the name for the pattern

Classic Shades has wonderful "painterly" color changes
Classic Shades has really pretty, long and short subtle color changes that made it exciting to watch how the stripes were developing. I've used color #724 "Campfire" for this cardigan but this yarn comes in many, many fascinating color combinations that make the choice quite difficult. :)

And Universal Yarns has now matching Classic Shades Solids to coordinate the ribbing with your self-striping color choice. Pretty cool!

Alright, back to the pattern. The cardigan is worked in one piece from cuff to cuff which makes it a quick knit. The neckband and buttonbands are worked from the center back neck downwards and then joined with picked up stitches for the bottom ribbing. This further supports the fresh and slimming vertical lines with vertical ribbing down the front and around your waist.

The pattern is sized for 6 (!) sizes and comes with detailed schematics and an Appendix for special techniques used in this pattern. They are: a One-Row Buttonhole, the Knitted Cast-On (for "growing your sleeve to the full body length), the Cable Cast-on (for the button hole) and the Provisional Crochet Cast-On (for the neckband). You are always welcome to replace them with your own favorite technique.

If you are interested in this pattern, you can purchase it for $4.50 through Ravelry (you don't need to be a member) by clicking on .

Happy Knitting and have a wonderful Fall season!

Monday, September 3, 2012

Beaded Peacock Socks in Sock-A-Licious (by Kollage Yarns)

After a super busy summer of designing, knitting, pattern writing, tech editing and spending time with my boys over summer break, I am finally able to cast on for my 2nd version of my upcoming "Beaded Peacock Socks" pattern. :)

The first version, sported a solid colored yarn (5th Avenue Toe-rriffic Sock Solids, color #0503 Violet)  with multicolored beads...

Version 1: Solid colored yarn with multicolored beads

...and this 2nd version, will be in a multicolored yarn with solid colored beads...

For the multicolored yarn, I've picked this really wonderful yarn called Sock-A-Licious by Kollage Yarns in the colorway Purple Heart (#7814). It's a 70% fine superwash merino, 10% silk, and 20% nylon mix that really lives up to it's name of Sock-A-Licious and with ample yardage too (354 yd/325m per 3.5 oz/100g).

Colorway: Purple Heart (#7814)

It has a wonderful hand, is deliciously soft (no problem for next to skin) but tightly spun to show off cables and other textures well and it comes in many vibrant, deep colors. It's a joy to knit with. :)

Since the original socks have been completed, I've run across a new nifty cast-on, especially well suited for toe-up socks. It's a brain child of Judy Becker (as in Judy's Magic Cast-on), as well as Queen Kahuna.


Here is a YouTube link to a video by Cat Bordhi of how to do this Stockinette center, toe-up cast-on. LOVE it! This is going to be my new favorite toe-up sock cast-on. :)

Happy Knitting!


Friday, August 17, 2012

Knitter's Magazine #108: Jubilee

Yippee, the first Fall oriented pattern of mine has just come out in the new Knitter's Magazine issue #K108 and it's called Jubilee! What a fitting name for this Fair Isle collar and cuff jacket. :D

© XRX, Inc.
It's a wonderful jacket to throw over your solid colored t-shirt or turtleneck and you are dressed to go.

With this design I tried to do something different than the traditional placement of Fair Isle colorwork and used it for a wide collar and cuffs to steal the show of an otherwise slick, slightly shaped and classic cardigan.


Invisible shaping rows create a gentle curve in the collar


I absolutely LOVE how the Fair Isle collar turned out after incorporating 2 invisible shaping rows that don't interrupt the Fair Isle pattern and give the collar extra fabric to nicely curve around your back neck.
The bottom hem, collar and cuffs all have a "mouse tooth" edging and folded over lining for a clean finish. And the front button bands are knitted in together with the body.

Construction

The cardigan body is worked in one piece, from the bottom up to the armholes, then split into fronts and back.

The collar is knitted on and worked back and forth.

The sleeves are worked flat from the shoulder down, then joined to work the cuffs in the round.


 Yarn

I have to admit that this was the first time that I've worked with Cascade Yarns Cascade 220 and Cascade 220 Sport and I've enjoyed it quite a bit. It held up really well to my many unraveling sessions until I got the shaping and collar increases just right.

It's definitely a great fit for an outer layer like a cardigan and the colors are nice and rich. I will have to come up with a couple more designs of this very pleasant to knit with yarn.

Hope you will enjoy not only this pattern in the new Knitter's Magazine but also all the other inovative cardigans in this issue.

Happy Knitting!


Friday, August 3, 2012

Custom Knit: #396 Poncho by Bergere de France

Okay, I do knit a lot but that #396 is the pattern number and not my 396th custom knit, haha!

© Bergere de France

I was pretty excited when my friend Christine, owner of the CR.eations yarn shops in Ennis and Big Sky Montana, contacted me for a custom knit of this pattern because this was such a striking pattern that had already peaked my interest before she reached out to me.

And on top of it, I've worked with the Bergere de France Magic+ yarn already on a previous project and was pleasantly surprised by the 50% wool/50% acrylic fiber. It does NOT look or feel acrylic at all, is machine washable and has a wonderful drape. BTW, this is a thick worsted weight yarn and I would consider it of Aran weight.

I've made a couple of adjustments to the pattern:

  • Working in the round from the bottom up instead of two pieces that have to be seamed up, i.e. cast on 4 sts less for a total of 400 sts (size S/M) and eliminate the “k1” at the beg and end of the row instructions.


  • Changed direction of Stockinette stitch panel decreases to an ssk at the right edge and k2tog at the left edge so that they are less obvious.
  • Decided to work the “slip 2, k1, pass 2 sts over” instruction for the double dec to close out the St st panel as “slip 2 st tog as if to k2tog, k1, pass 2sts tog over” which will make the center st lay on top.
  • Worked the cuffs in the round and then sewed them to the bottom edge.
  • Used "Jeny's Surprisingly Stretchy Bind-Off" to finish the top.
It took me a little less than 2 weeks to knit this poncho besides my other commitments. It was a realy addictive pattern with me always wanting to knit just one more cable repeat, and one more, and one more..., and before I knew it, the body was done. :)

Plus it helped that there were less and less stitches as you moved up towards the neck.

Body is complete and only cuffs are missing
I've heard that the customer really liked her new hand-knit poncho and I had a fun time knitting this striking pattern.

Please feel free to contact me regarding custom knits as I do take some on from time to time (especially if it's an interesting pattern).

Thursday, May 31, 2012

Bead Knitting Hatband

My workshop teaching date (Thursday, June 7, 2012) for "Knitting with Beads" at this year's Estes Park Wool Market is coming closer and closer. The handouts are done and I am sorting out what beads and samples I should bring along for participants to touch, feel and explore. But as usual, my mind is running wild and comes up with more and more designs. I just can't keep up! :)


Bead Knitting Hatband
In this case, I was mulling over ideas for a sample that could showcase bead knitting (every stitch has a bead knitted through it, on both, RS and WS rows, so that the yarn doesn't show at all), a technique that was very popular during the Victorian time period when you would see some amazing bead designs for coin pockets or evening purses.

With bead knitting, no yarn shows

But I was looking for something more practical for our times and came up with this arrowhead/chevron design for a hatband. Here out West, the rodeo season is upon us and we ladies like to dress up in some sparkling Western wear. :)

It's a great little project to try your hand on bead knitting.

After deciding what beads to use (size 6/0 Czech glass beads in 4 colors)) and what kind of pattern I would like to see, it was a surprisingly quick project; about 30-45 minutes of pre-stringing the beads, ~4 hours of knitting, and ~20 minutes of sewing it to the hat. Definitely a good choice for a weekend project.

Brown #10 crochet thread and size 6/0 Czech seed beads in 4 colors.

And just to show you how my mind zooms off and gets ideas - for just a moment there, I thought, I saw a beaded rattlesnake emerge from the work in progress... do you see it too?

Doesn't this look like a little rattlesnake?
So, keep your eyes open and put down your knitting from time to time. You never know what you will find. :)


Wednesday, May 23, 2012

Apple Fruit Cozy

Another school year is coming to a close and it's time to figure out a little token of appreciation for my boys' teachers...


It's a little bit more complicated this year as our school district instantiated a law that allows teacher's gifts to be of a max. value of $25. So, no more pooling together money from the class to purchase a more substantial gift card or class gift. It might be considered a bribe! Even though these kids are leaving the teacher...

Good thing I'm a crafter! I zoomed over to Ravelry and started surfing patterns that could be potential gifts for teachers and I came across this really cute Pear Apply Cozy by Susan B. Anderson. Her blog entry has the actual knitting instructions.

I used Hobby Lobby's Yarn Bee Snowflake Wool Blend (color: #16 Caliope; 56% wool, 44% polyester) for the cozy and then added two leaves in Snowflake#5 Limelight, knit on US #3 (3.25 mm) needles.


The instructions for one leaf are:

CO 3 sts.
Work I-cord for about 1”.
Row 1 (RS): K1, yo, k1, yo, k1. 5 sts
Row 2 and all WS rows: knit.
Row 3: K2, yo, k1, yo, k2. 7 sts
Row 5: K3, yo, k1, yo, k3. 9 sts
Row 7: K4, yo, k1, yo, k4. 11 sts
Row 9: K5, yo, k1, yo, k5. 13 sts
Row 11: Ssk, k9, k2tog. 11 sts
Row 13: Ssk, k7, k2tog. 9 sts
Row 15: Ssk, k5, k2tog. 7 sts
Row 17: Ssk, k3, k2tog. 5 sts
Row 19: Ssk, k1, k2tog. 3 sts
Row 21: Sl1 kwise, k2tog, psso. 1 sts
Break yarn and weave in.
Use beg yarn tail to sew I-cord to apple fruit cozy.

What a cute, useful and quick to make gift it is!


Friday, May 18, 2012

Chevron Sweater (for Kollage Yarns)

Yippee, I can finally blog about my exclusively designed Chevron Sweater (product #3807) for Kollage Yarns!


Photos by Kollage Yarns
 
It's the perfect sweater for those in between seasons, i.e. Spring and Fall, and it works well with your jeans as it is knit with yarn made from recycled jeans! Love it! :D

The yarn is called Riveting Worsted, is made of 100% recycled yarn from recycled blue jeans and comes in 9 wonderful colors (163 yd/149 m per 3.5 oz/ 100g). And even though it is a typical, thicker weight cotton, it makes for a nice, soft drape as you can see in the photo above.


The sweater itself is an A-line sweater with a square neckline and instead of just straight horizontal stripes at the bottom, I've turned the stripes into a variation of a chevron pattern with vertical eyelet columns.


Swatch knit with Red Heart Eco-Cotton Blend
My original swatch was a bit more colorful (I love color) and I've posted it here to give you another color combination option.

Construction

The body is worked in the round from the bottom up, then the piece is split into front and back and worked separately back and forth.

For the top part, the eyelets are replaced by M1 increases to from a less revealing fabric.

The sleeve is worked back and forth and and has a sleeve cap for a nice fit. A double eyelet column runs down the center of the sleeve for added visual interest.

I think it makes for a fresh but classic sweater design.

You can purchase this pattern for $7.50 via Kollage Yarns' website.

Happy Knitting!

Friday, May 4, 2012

Seaglass Shell Follow-Up

Wow, I am blown away by how well the Seaglass Shell has been received by the knitting community! It really seems to have hit a cord... The number of hearts this design has received so far on Ravelry is just amazing! And it's rapidly closing in on a 1000 hearts!
Thank you, thank you so much for your love and posting wonderful pictures of your completed projects. :)

It's always a nail biter for me to see how a design turns out when somebody else knits it. Sure, I've knit the sample and done the math but you never know if it looks the same/similar when knit with different yarn and for different body types. So far, they all look fabulous! Great job, fellow knitters! :D

We even started a KAL thread on Ravelry where you can ask questions if you need help and where you can show off your finished piece.

One of the requests I've noticed on some of the forums was to see the front of the Seaglass Shell. Here are my personal (non-professional) pictures that show the Seaglass Shell from different sides including the front:

Different views of the Seaglass Shell (photos by Daniela Nii)
Hope this helps you to decide if you would like to cast on for this wonderful summer shell.

Best,
Daniela

Monday, April 30, 2012

Interweave Knits: Seaglass Shell

The hot topics for this summer are lace and showing off your back. :)

© Interweave Knits Summer 2012: Seaglass Shell
The design for this top was inspired by my memories of hiking in the mountains during the snow melt when you can admire beautiful waterfalls and creeks full of water rushing around rocks and boulders, tumbling towards the valley floor and then hurrying along to the sea...

Considering that I made my sketches for this design at the end of last year (winter) I must have already been looking forward to Spring, haha!

On the other hand, if I transport myself to summer, I can also totally see how Interweave's team came up with the name "Seaglass Shell" for this piece. Just imagine the boulders becoming glass pieces that are being rolled around by the waves (Rivulets) and becoming more and more rounded...  ah, yes, the beach! :)

I really like how the front of the top looks so deceptively simple (Stockinette stitch) with just a bit of lace peaking over the shoulders...
Lace peeking over the shoulder to the front (© Interweave)
...and then, the back has a little surprise in store: the top drops away into a low back line revealing a misty lace of rivulets and boulders - or sea-glass and waves. Perfect for the upcoming summer parties!

Rivulet and Boulder lace Interweave)
The lacy back panel is sandwiched and sewn together with the low cut back panel and the front piece at the side seams so that there are no peek-a-boo accidents. :)

Now, this lace is a bit more challenging as both lace patterns, the Rivulet and Boulder lace, are worked on RS AND WS rows so that you will have to pay a bit more attention when knitting. But then again, it's just for one panel and not a whole garment or a long scarf.

It makes for a great little project to try your hand in "Knitted Lace" (pattern worked on RS & WS rows) instead of just the RS rows (= "Lace Knitting").

And if you can get your hands on this Manos del Uruguay Serena (60% baby alpaca, 40% cotton, sport weight, distributed in the US by Fairmount Fibers) or similar yarn, you are going to feel like being in heaven! It is so buttery soft and a dream to work with that you don't want to let go. When you wear the shell, it's so misty light that you barely feel that you're wearing something. Better double-check before you step out of the house, haha! :)


And here is a little peak behind the scenes:

When a design is accepted by Interweave, you are usually required to size your pattern for 5 (!) sizes. Keep that in mind when you start working on your sample size model. I highly encourage you to think your design through before you knit a single stitch to ensure that your pattern can be naturally sized for the larger sizes.

You want to look at any areas that require shaping (e.g. waist, armholes, necklines) to make sure any patterns can flow nicely or are centered for ALL sizes.

In the case of this back lace panel, for example, I dreaded the waist shaping because I would have to figure out a nice degrading of the lace designs at the side seams...not fun...

That's when it hit me that it actually wouldn't be visible because it was underneath the Stockinette back panel! Then why bother? How about having a small strip of just Stockinette stitch run along the side seams that will absorb the decs and incs for the waist shaping and keep the lace going straight up? - Better make sure that it works out with the armhole shaping when it becomes visible again...

It was a good thing that I took a moment to think it through because it saved me a major headache and made the instructions for you that much simpler. :)

Sizing calculations for centering & placement of lace patterns on back panel
The pattern is currently only available by buying the Interweave Knits Summer 2012 issue. Down the road it will be added as a single pattern for purchase in the Interweave store and thereafter through my own website and Ravelry.

Happy Knitting!

Thursday, April 19, 2012

Beaded Family Wrist Warmers

I am busily getting ready for my full day "Knitting with Beads" workshop that I will be teaching this year at the Estes Park Wool Market on Thursday, June 7, 2012. I am really excited about this opportunity to share my love of knitting with fellow knitters. And add to that a full day of play with beads! It can't get much better than that. :)

Besides learning how to read/create charts and finding out about the many different techniques for knitting with beads you will actually design and start knitting your own beaded Garter stitch wrist warmers!

Beaded Family Wrist Warmers
Obviously it would be a great idea for me to have a couple of beaded wrist warmers along as samples to show not only what works well but also what might not be the best choice. Don't we all learn from mistakes more than from successful projects? And I sure had some disappointments when designing these wrist warmer samples which I will be happy to share at the workshop. :)

But here is a successful design that I call the "Beaded Family Wrist Warmers".

It all started out with me wanting to use one of those traditional Norwegian patterns of dancing children or adults and convert it for beads. But as I was fiddling around with the beading chart my mind wandered off on one of its typical "what else can you do with this design" explorations and oh, boy, did I come up with lots and lots of other ideas. I wish I had more time in the day to keep up with my mind! :)

The one idea that made me pop up, literally, and was nearly a 'duh' moment was when it occurred to me that I could make a whole family circling the wrist warmer - just like you see on some decals on cars. I myself would LOVE to wear my family around my wrists and be constantly reminded of how lucky I am. :)


And as an added bonus, I would have a great Mother's Day or birthday gift for my mom that was coming up very soon. Ooh, I liked that idea.

Now, as I was thinking this idea through, it would make sense to allow other knitters to customize their family line-up to their needs to make it a really useful pattern. So, back I went to fiddle with the charts some more to allow a mix and match of the individual designs. I ended up with a chart for a

  • mother
  • father
  • son
  • daughter
  • dog
  • cat
that can all be put together so that they are holding hands, well except the dog and cat; they are free standing.
Chart for mother

I was able to size the designs so that a typical 7" cuff can accommodate 2 adults and up to 6 children! If you don't have that large a family, you would center your family line-up and have just the triangle edging around the back.

Then came the next decision: How wide should the wrist warmer be? I know that for at home use I like them to be on the shorter side whereas in fall/winter I like them to be longer to keep the draft out from my coat sleeves... So, I made one sample cuff shorter and one longer with instructions on how to adjust them to your need. And watch out when you work the longer version: depending on which side of the chart you will add the extra length will determine the direction the family will face - looking at you or at your fellow friends. :)

Writing the Pattern


Now that I had my samples knitted up it was time to tackle the pattern writing. It's always quite time consuming because you have to be so precise in your instructions and can't assume anything. I don't know the level of knitting experience the purchaser will have. Or, at least that's the standard that I am using.

The other thing I like to do with my patterns, besides precise instructions, is to add pictures to show visually a perhaps tricky spot or to help you double-check what your work is supposed to look like at a certain stage...and sometimes I forget to take those progress pictures while I work up the sample because I am so enthusiastic about finally knitting or trying to finish... that I need to knit another one just to take that important picture!

Yep, I should know by now to keep my camera close. But then I do knit all over the place, at my boy's soccer practice, waiting to pick them up from school, at knitting groups, late at night, etc. when the setting is not right to take that progress picture. What to do then? Obviously, I should stop knitting and set it aside until I can take the proper picture. But do you know how hard it is to stop and wait!? It takes a mighty dose of will power - at least for me. :) So it comes down to - is it really worth to finish now and then redo a portion - or - can you wait, take the picture, and finish then?

Pattern was written, charts were made, progress pictures and a short photo tutorial for how to work a "Bead Stitch" were in the camera, and now it was time to format everything and get that all important cover page photo - the one that represents your work - that sells the pattern.

A brainstorming session was in order to figure out what I wanted to convey with my cover photo. And how do you photograph wrist warmers so that you show enough of the design but don't give it away? It also can't be too busy, else it would distract from the design. So what items would help me tell the story without overpowering the piece?

That's when I realized that I LOVE to receive snail mail and it would be a great gift to my mom to write her a letter, take some time out of my busy day and just think of her. The photo shoot was set: a cup of coffee with great chocolates (received from a friend over at ButterflyForge.com), a nice letter paper, the cuffs and my husband to take pictures. :)

And there you have it - a finished pattern.

If you would like to purchase your own copy for $4, here is the link:

Sunday, April 15, 2012

Designer's Challenge: 1st Place for Beaded Peacock Socks

Whoohoo!
Thank you all for voting for my first time ever toe-up Beaded Peacock Socks over on the March Designer's Challenge thread!

1st Place Winner in the March Designer's Challenge on Raverly
They've placed first and even though it has been super rewarding and educational to design these socks already, the yummy yarn price just tops it off! :D

Thank you Knit Picks and Cascade Yarns for supporting our Designer's Challenge Ravelry group of talented designers of all ages and skill levels.