While I was working on a couple of Fall/Winter designs that involve cables and bobbles and I was researching and surfing the web, I came across this really neat "trick" to speed up knitting bobbles.
In summary: instead of turning your work to work a back row for your bobble and then turning your work back, you knit backwards for those few stitches with the right side always facing you.
Here is a nice video with Eunny showing the backwards knitting (starts at about 3 min into the video):
It really speeds up things and you should give it a try for this fall and winter seaons.
Showing posts with label Learned Today. Show all posts
Showing posts with label Learned Today. Show all posts
Friday, May 6, 2011

Monday, March 7, 2011
 |
Learned Today: Felted Join |
I've been working on a couple of non-blogable projects lately that are slated for magazines coming out in the Fall 2011 so that my blog has been a bit quiet
But, as with any project that I like to work on, I've learned a few new things along the way. Today, I will share with you my discovery of the "Felted Join".
One of my projects involved some super thick wool yarn. I have never before worked with super bulky yarn and was a bit worried about what to do when the time would come to weave in the ends from multiple balls... This would make for a very thick, not very attractive back side...
Before I got along too far, I went surfing on the web and soon found a great solution for my problem: the "Felted Join".
I could think of quite a few positive points about this join:
I've put together a couple of pictures to show you this great joining technique.
 1) Two yarn ends that need to be joined.
This technique works only with feltable yarn (at least 30% - 50% animal fiber like wool, mohair, alpaca, etc.)
 2) Split and fray yarn ends for about a 1/2 inch (max. 1 inch).
 3) Stack the two frayed yarn ends so that the two 1/2 inch section lay on top of each other.
 4) Wet the fiber by either wetting your fingers in a water glass and applying it to the ends or stick them quickly in your mouth to wet them.
 5) Place the moist/wet frayed yarn ends on your palm, and
 6) Rub your palms together to roll the yarn back and forth.
 The heat from the friction together with the moisture will felt the frayed yarn ends together.
 Tada! Your yarn ends have been permanently been bonded and this join will be pretty much invisible.
This technique came in very handy for my project and I highly suggest that you give it a shot too on your next project with bulky or thicker animal fiber yarn.
And if you have a non-feltable yarn, check out the "Russian Join". That sounds like a great solution for thick acrylics.
Happy Knitting!
But, as with any project that I like to work on, I've learned a few new things along the way. Today, I will share with you my discovery of the "Felted Join".
One of my projects involved some super thick wool yarn. I have never before worked with super bulky yarn and was a bit worried about what to do when the time would come to weave in the ends from multiple balls... This would make for a very thick, not very attractive back side...
Before I got along too far, I went surfing on the web and soon found a great solution for my problem: the "Felted Join".
I could think of quite a few positive points about this join:
- Perfect for joining feltable yarn when adding a new ball
- It is super fast (~30 seconds)
- No bulk
- Nearly invisible
- No wasting of yarn
I've put together a couple of pictures to show you this great joining technique.

This technique works only with feltable yarn (at least 30% - 50% animal fiber like wool, mohair, alpaca, etc.)


This technique came in very handy for my project and I highly suggest that you give it a shot too on your next project with bulky or thicker animal fiber yarn.
And if you have a non-feltable yarn, check out the "Russian Join". That sounds like a great solution for thick acrylics.
Happy Knitting!
Tuesday, March 1, 2011
|
|
Learned Today: Raised Increases |
When I need to increase a stitch within the body of a garment and want to control the direction of the added stitch, I resort to the Raised Increase technique. It increases a stitch by working into a stitch in the row below the current stitch, hence it's called a "Raised Increase".
There is a Right Raised Increase (RRI) and a Left Raised Increase (LRI) named for the side the increased stitch will rest on in relation to the root stitch.
The following pictures will show you the two raised increases:

2) Insert the needle from the front to the back into the right edge of the stitch in the row below.
 3) Yarn over needle and pull through - knit the picked-up stitch from the row below.
 A right raised increase has been knit.
4) Then knit the next stitch (= root stitch) on the needle.
 This is how a Right Raised Increase (RRI) looks like:
You can see that from the root stitch a new stitch is branching off to the right.
Left Raised Increase (LRI)
 1) Work to and including the stitch for which the increase will fall to the left side of = root stitch.
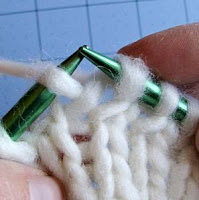 2) Insert the left needle from the front to the back into the left edge of the stitch in the row below.
 3) Knit the picked up stitch from the row below.
 This is how a Left Raised Increase (LRI) looks like:
You can see that from the root stitch a new stitch is branching off to the left.
I hope this helped. :)
There is a Right Raised Increase (RRI) and a Left Raised Increase (LRI) named for the side the increased stitch will rest on in relation to the root stitch.
The following pictures will show you the two raised increases:
Right Raised Increase (RRI)
Summary: The RRI is worked into the right leg of the stitch in the row below the st on the left needle.
1) Work to the stitch for which the increase will fall to the right side of = root stitch.
1) Work to the stitch for which the increase will fall to the right side of = root stitch.

2) Insert the needle from the front to the back into the right edge of the stitch in the row below.


4) Then knit the next stitch (= root stitch) on the needle.

You can see that from the root stitch a new stitch is branching off to the right.
Left Raised Increase (LRI)
Summary: The LRI is worked into the left leg of the stitch in the row below a stitch that was just knit (and on the right needle).


You can see that from the root stitch a new stitch is branching off to the left.
I hope this helped. :)
Subscribe to:
Posts (Atom)